Hard Surface Techniques and Building a Sci-Fi Helmet


Building A Base Mesh
 |
| Build on top of existing head model. |
 |
| Append PolyShere or Sphere 3D |
 |
| Using Transparency, make sure the head is not sticking out through helmet. |
 |
| Play with forms! |
 |
| Using the Flat material and masking to play with shapes. |
 |
| Masking and sculpting along edge of mask to pull out hard edges. |
Refining Forms
 |
| Using a combination of Smooth and HPolish to refine. |
 |
| Dam_Standard to sketch construction breaks in helmet. |
 |
| Start to think about which regions will be different materials. |
 |
| Giving the helmet some context |
Creating Panels
 |
| Create PolyGroups for different sections either by masking or using Group Visible. Use the Ctrl+W hotkey for both. |
Panel Loops Settings (Tool -> Geometry -> Edge Loop -> Panel Loops)
Panel Loops: Press this button when you want to convert your Polygroups to panels.
Loops: The Loops slider defines the number of polygon loops which will be created on the bridge between the inner and outer surfaces of the panels.
Double: When turned on—and the tool is on by default—Panel Loops will create an outer and inner surface for each panel.
Thickness: This slider will affect how thick or thin your resulting panels will be. Try the default setting and if the panels are not thick enough, bump up the setting to 0.02. The Thickness setting is a fairly sensitive one, so you probably won't have to crank the value too high.
 Polish: This setting will unfortunately get rid of details you've sculpted, but it does a great job at creating clean edges around your panels. Adjust it until you get the result you want.
Bevel: The Bevel slider controls how much of a bevel is created between polygroups.
Elevation: This slider controls whether the panels are pushed outward, inward, or both. A value of 100 means the panel thickness will be created outward only. A value of 0 creates panels that push outward and inward. A value of -100 creates panels that push inward only.
Bevel Profile: Adjust the Bevel Profile curve to change the shape of bevels created on the panels. A gap will be created between panels if all of the points are below the vertical halfway point. If any points cross above this vertical halfway point, the panels will intersect each other.
Another method for creating panels is the Mesh Extraction, which can be found under Tool > Subtool > Extract. This subtool behaves similarly to the Panel Loops tool but offers the user a little less control. To use it, follow these steps:
Paint a mask.
Press Extract. This is just a preview of what will be extracted. Adjust the Thickness slider to get the desired thickness.
Press Accept.
The extracted mesh will become a separate subtool. From here you can use Tool > Deformation > Polish (or Polish By Groups) to smooth the edges of the extracted mesh.
 |
| Clean up any unwanted PolyGroups. |
Breaking up the Forms
 |
| Using Photoshop to quickly sketch in panel lines. |
 |
| Dam_Standard for panel lines. |
 |
| Use Pinch to tighten up the panel lines. |
Alphas and Detailing
 |
| Use masks to control the area affected by an alpha. |
 |
| Standard brush with Drag_Rect stroke and Alpha 46 for these little tick marks. |
 |
| IMM Brush for adding rivets. |
 |
| IMM Brush for tubing. |
 |
| Varying the surface texture. |
Assigning Multiple Materials
Assigning different materials in ZBrush is pretty simple. It's easiest to separate pieces into subtools based on their material types. For example, you wouldn't want to have metal and leather pieces in the same subtool. There is the option to paint materials, which we'll look at, but it's a little less straightforward.
Filling a subtool with a material involves the following steps:
Click the M button, which is located along the top shelf of your interface (or in the Draw palette). This feature instructs a selected tool to paint the active material as well as displace the surface (assuming either the ZAdd or ZSub draw mode is still activated).
Choose the material you want. For this section of the helmet, Toy Plastic gives a good hard plastic look. You'll notice that all subtools will update when you choose the new material. This is because we have not filled any of them with specific materials; therefore, they will update every time you switch materials. This is ideal for sculpting.
Fill your subtool with the active material by going to Color > Fill Object. You'll notice the little paintbrush is now lit up for the active subtool in the Subtool palette. This means Tool > Polypaint > Colorize is turned on enabling you to paint materials and colors.
Now when you switch to another material, the subtool that you just filled will remain unchanged.
 Some other instructions to keep in mind while working with materials.
To fill a subtool with color only, follow the same steps as above, except turn off M and turn on Rgb. You'll also be changing colors from the Color Picker instead of materials.
To fill a subtool with material AND color, use Mrgb.
To paint specific areas of a model with a material, make sure to turn off Zadd and Zsub and turn on M. Simply choose the material you want and paint on your material. For example, these rivets were sculpted using an alpha, so they can't be split into separate subtools. In order to make them metal, we'll have to paint them.
 For this example, we'll use the Standard brush with a dark gray color and the ReflectedPlasticB material. This should give the shiny white plastic a nice contrast. The Mrgb button is active in order to paint material and color.
 |
| Materials don't blend well when painted. You can see here, there's a hard edge where one material meets another. |
 |
| Turn the Focal Shift setting on the brush to -100 to get a nice hard edge. |
 |
| Paint the areas that need to be painted. |
Rendering
 |
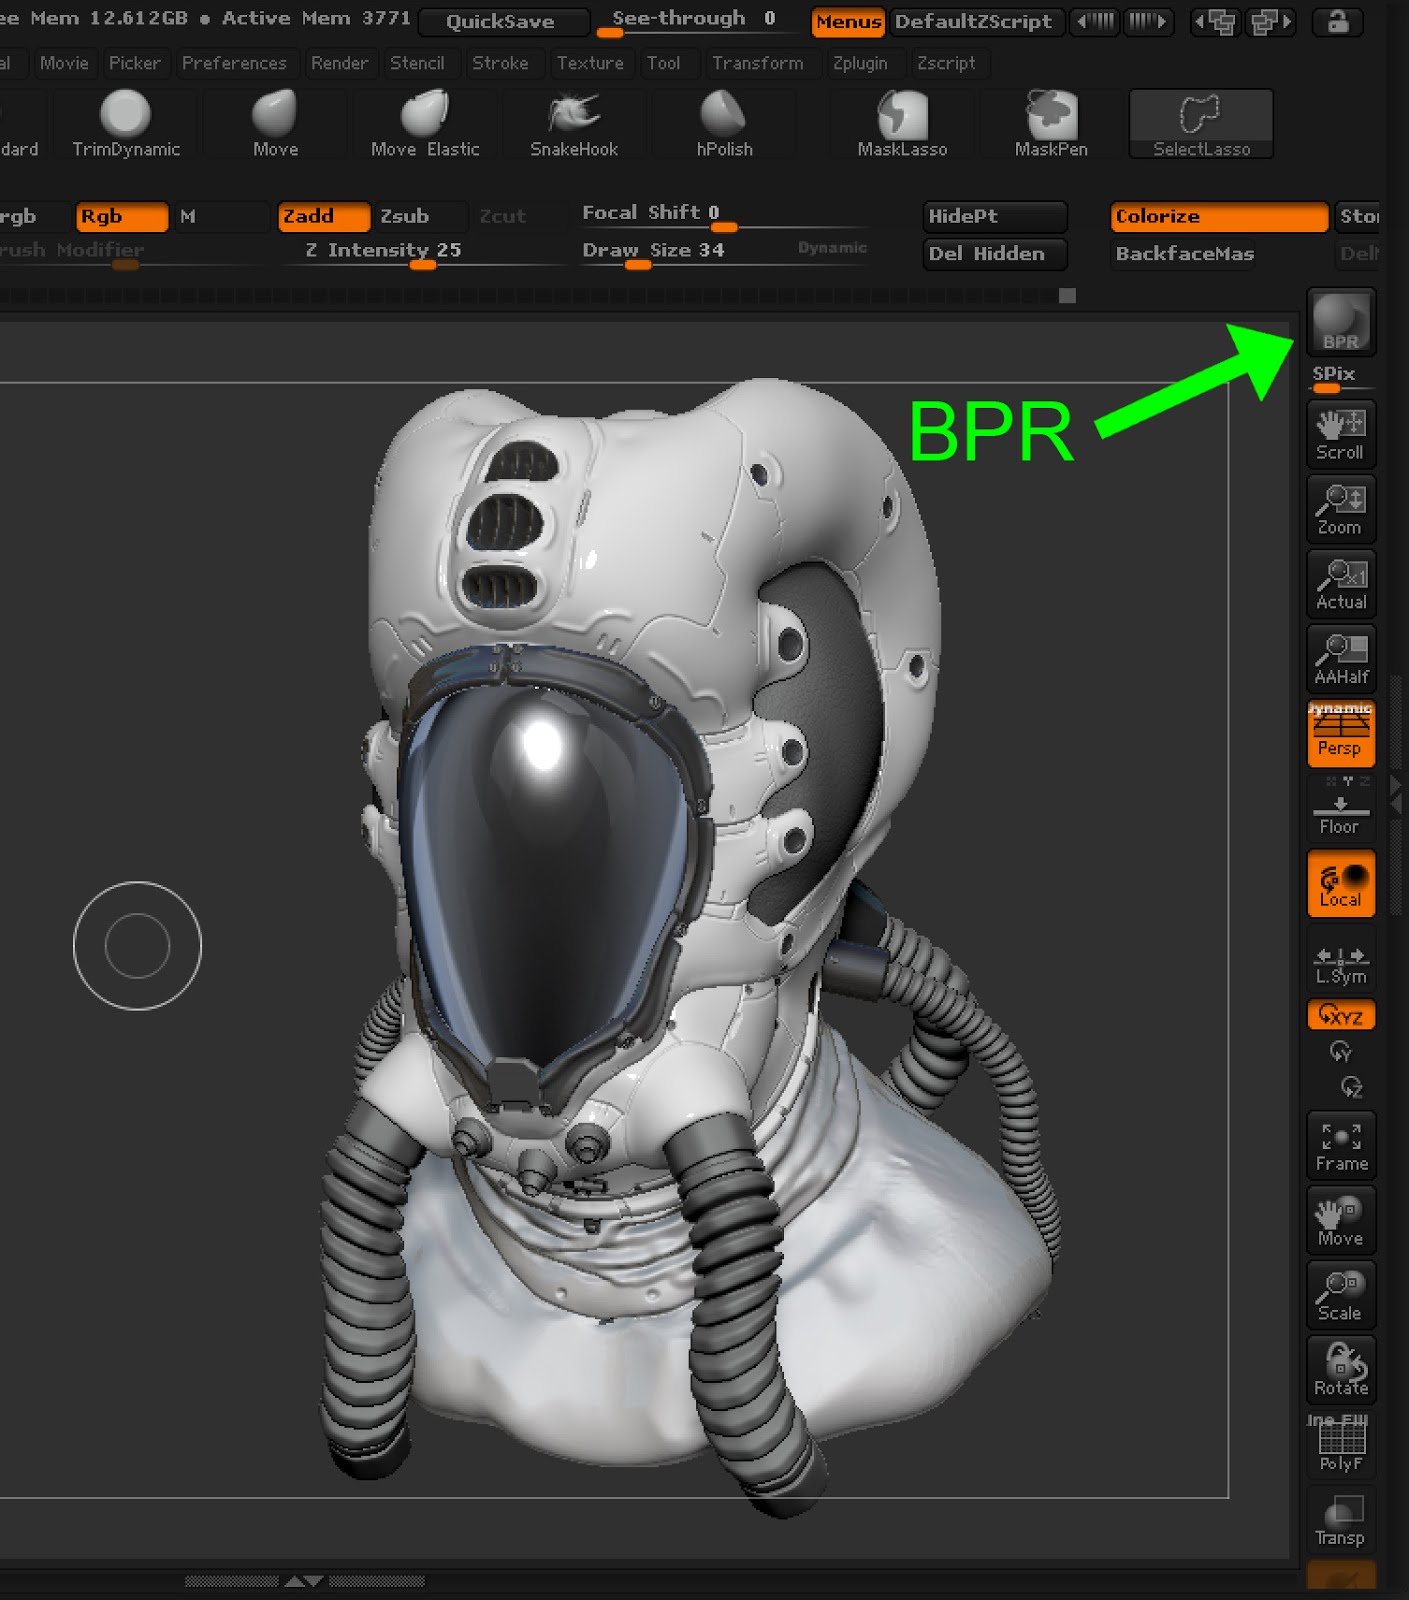
| We're going to look at Best Preview Render (BPR), which is used for quick rendering of all visible subtools in Edit mode. To run a BPR render, use the Shift+R shortcut or press the BPR button at the top of the right shelf in the interface. |
 |
You'll notice the main difference is that you can now see cast shadows from the Light palette lights.
|
 |
| You can adjust your Light Placement to try different lighting styles. Just go to the Light Placement sphere under the Light menu and move the small orange dot around. Then press Shift+R and repeat until you get something you like. |
 |
| To soften your shadows, turn up the Angle setting, which you can access by going to Render > BPR Shadow > Angle. |
 |
| The higher the Angle value, the softer the shadow will get, but this means you'll need more rays otherwise your shadows won't be smooth. The higher the Rays setting the smoother the shadows will be. Increasing the Rays value will increase render time. |
To export a render, go to Document > Export.
Homework:


 Some other instructions to keep in mind while working with materials.
 For this example, we'll use the Standard brush with a dark gray color and the ReflectedPlasticB material. This should give the shiny white plastic a nice contrast. The Mrgb button is active in order to paint material and color.


No comments:
Post a Comment