
-Class 10-
OVERVIEW
- ZSpheres: What are they?
- ZSpheres: Basic Controls
- Zspheres: Move, Rotate, and Scale
- Building a Simple Humanoid Mannequin
- Transpose: Move, Rotate, Scale, Action Lines
- Posing using Transpose
ZSpheres: What are they?
You might use ZSpheres to build a figure or creature much like you would do using DynaMesh and starting with a sphere.
With ZSpheres you can do things like:
- Quickly pose your character using ZBrush's Transpose to easily edit the pose on the fly.
- Create a clean base mesh with good topology and edge flow.
- Build complex designs with lots of limbs using the ZSphere topology as if they were joints and bones.
- Add, remove, and scale ZSpheres as you work to get the design you want.


Basic Controls:
Found in the 3D Meshes section of the Tool Palette

ZSphere Terminology

Click + drag on existing ZSphere while in Draw mode (press the "Q" key) to add a new one.
Press and hold Shift to create the new ZSphere at the same size.

To move the child ZSphere away from its parent, click and drag to create a new ZSphere, then press the Ctrl key (Windows) or the Command key (Mac) to lock the ZSphere's scale. Then continue dragging.

To add a ZSphere between two existing ZSpheres, make sure you are in Draw mode and click on one of the link-spheres between the two ZSpheres in question. To delete a ZSphere, press the Alt key (Windows) or the Option key (Mac) and click the ZSphere you wish to delete.
 You can preview your mesh at any time by pressing the "A" hotkey. You'll notice that polygroups are automatically created on your mesh.
Moving a ZSphere
To move a ZSphere, first switch to the Move mode by pressing the "W" key or by clicking the Move button on the top shelf in the interface
Rotating
Click and drag a ZSphere to rotate it and its child ZSpheres aroundabout the parent ZSphere of the ZSphere you clicked.
Click and drag a link-ZSphere to rotate it and its child ZSpheres around the parent.

Preview your mesh as you rotate ZSpheres because rotating can produce twisted
Press Alt (Windows) or Option (Mac) and click on a ZSphere to fix any twisted geometry.
Scaling
Click the "E" key to switch to Scale mode, or you can activate the mode by clicking the Scale
Click and drag on a ZSphere to resize it. Sometimes it can take several attempts to get a ZSphere to the size you want, so try pressing the "1"
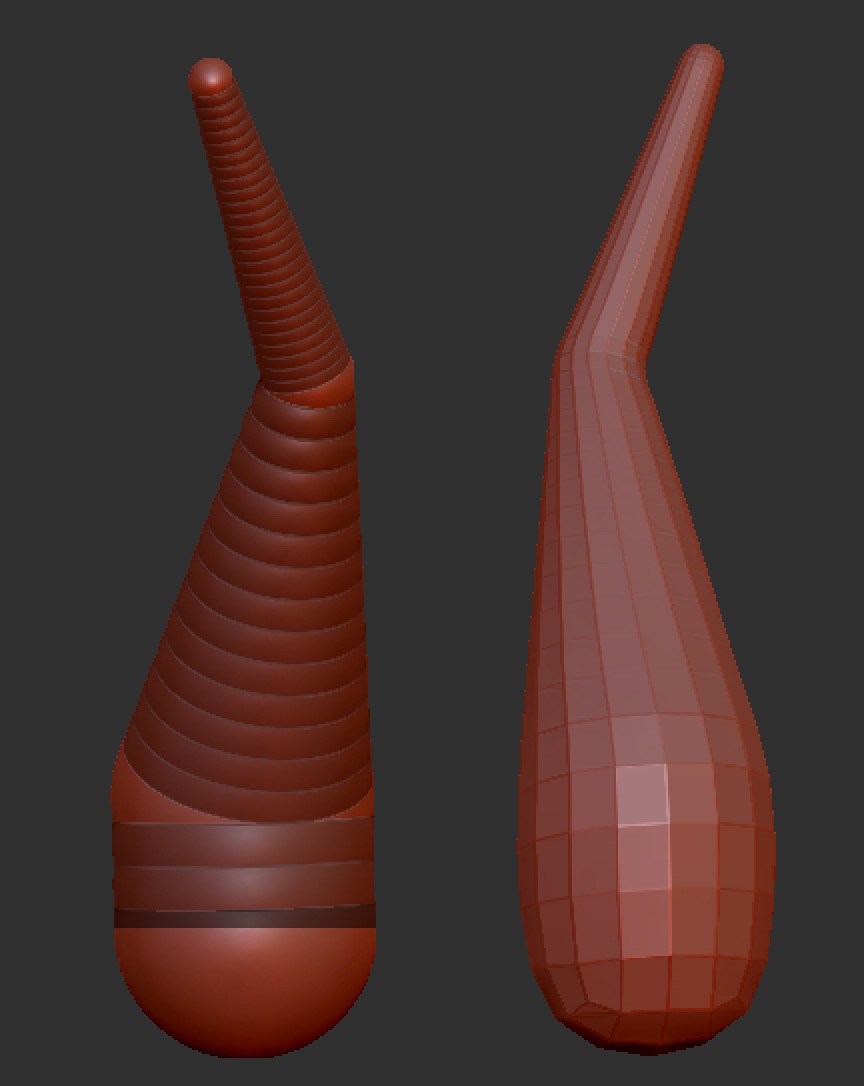
Building a Simple Humanoid Mannequin
We are now going to take a look at how to use ZSpheres to create a simple humanoid mannequin. You'll be able to use this mannequin as a starting point for future characters so hang on to it when you are done!

Draw a ZSphere on the canvas and activate X symmetry (click the "X" key). Draw one ZSphere on the top and one on the bottom. This will become the torso.

Add two ZSpheres at the shoulder and the hips. This first set of ZSpheres should be much smaller than the torso ZSpheres. Then, hold down the Shift key to create the second shoulder-and-hip set of ZSpheres at the same size.

Now add ZSpheres for the limbs and pull the new ZSpheres all the way down to where the hands and feet will be. We'll add joints later.


Download and use this for your image plane.
At this point, it can be helpful to check your proportions. Pull up a trusted image of human proportions (the author and illustrator Andrew Loomis has a great one) either on your desktop or through a Google Image search and switch back to ZBrush. Turn the "See-through" setting (found at the top of your interface) to a value between 40–50 and use the Move mode to adjust your mannequin's proportions. When you're finished, turn the See-through value back to "0".

Next, go to Draw mode and click on the link-ZSpheres to add elbows, wrists, and knees. Then switch back to Move mode to add a slight bend to the arms and legs.
 Add and position ZSpheres for the feet.
 Add and position ZSpheres for the feet.
Add one ZSphere for the neck and one for the head. Move and scale the head as necessary.
 Preview your mesh by pressing the "A" key and the wireframe by using the Shift+F shortcut.
 When you're done editing the ZSpheres, skin your ZSphere model by pressing Tool > Adaptive Skin > Make Adaptive Skin. Don't worry if you don't see anything happen, the Make Adaptive Skin tool creates a new Ztool. So in order to work with your newly skinned model, you must first select the new Ztool from the Tool palette. Be aware that your new model will have two subdivisions.
Transpose
Let's take a closer look at the Transpose tool, one of ZBrush's most useful features. We've looked at how to use Transpose to move unmasked parts of models, as well as to move, rotate, and scale separate meshes while kitbashing. Now we'll take a more thorough look at Transpose and analyze how it can be used for posing a character or creature.
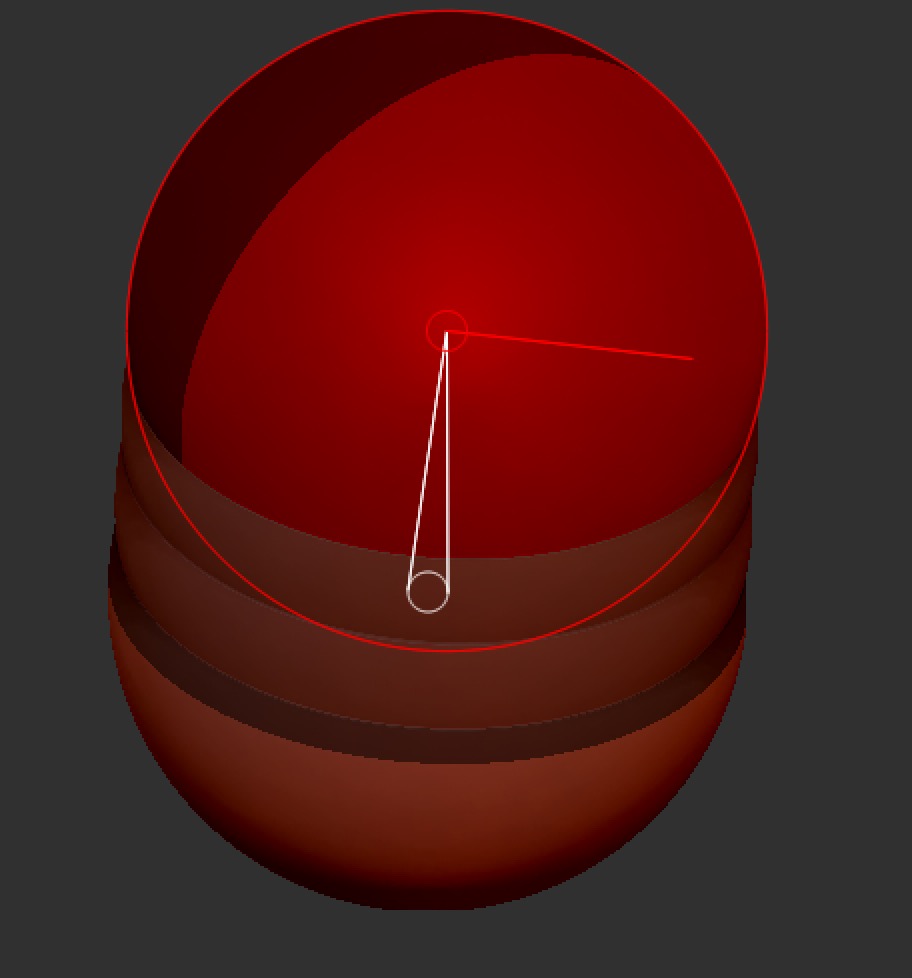
Action Line
Terminology that we'll be using as we further describe the action line.
Here are some controls for working the action line:
- To create the action line in a new position, click and drag anywhere on the model. The endpoint will snap to whatever part of the model is underneath it. If the endpoint is above the canvas, the action line will be drawn perpendicular to the viewing angle.
- To reposition an endpoint of the action line, click and drag the yellow (outer) ring of the endpoint you wish to reposition. The point will be moved on the plane of the screen—that is to say, its distance from the viewer will not change.
- To reposition the entire action line, choose from the following:
- Click and drag the yellow ring of the center circle.
- Click and drag on the line.
- Clicking the mesh will automatically create the action line perpendicular to the surface for that part of the mesh.
- Clicking on a manipulator will realign the action line based on an X, Y, or Z (red, green, or blue) axis that is relative to the current position of the action line.
- Click the white circle at the end of the action line to align the camera to the action line. This will only affect the camera's position; it will not move the model.
Watch the following demo for more on using the Transpose tool:
https://www.youtube.com/watch?v=oklGNozjHf0

https://www.youtube.com/watch?v=oklGNozjHf0
Posing Using Transpose
Let's take a look at how to pose a character using the Transpose toolset. We'll work primarily in Rotate mode and use the Move brush to do some adjusting. Be careful when using brushes like Move since they will stretch the geometry thus altering the proportions of your model.

 First, we'll load an image plane as reference using Draw > Front-Back > Map1 > Import. The floor must be turned on to see this type of image plane. Turn the floor on by pressing the Shift+P shortcut or using the button on the right shelf.
 Scale your model to roughly the same size as the reference image.
 Create six polygroups by pressing Ctrl+Shift (Windows) or Command+Shift (Mac) to isolate or hide existing polygroups. Then go to Tool > Polygroups > GroupVisible
 Ctrl+click on the lower part of the torso dragging upward to mask the legs.
 Tilt and twist the torso into place.
 Press Alt (Windows) or Option (Mac) and click the leg to mask everything but the leg. Then, click and drag out the action line, clicking on the hip and dragging to the knee. Rotate the leg outward by clicking and dragging the handle on the knee.
 Once again, position the action line from the hip to the knee, this time pressing Alt (or Option) and clicking the handle on the knee to bend only the geometry below the action line (the lower portion of the leg).
 Use the Inflate brush to add the mass of the face. This will give you some context and make it easier to rotate the head into the correct position.
 Rotate the head into position.
 Rotate the arm into position.
  Remember that you can always paint in and away from your mask. For example, if you want to rotate just the shoulders (since they don't have their own polygroup), you can pres Alt (or Option) and click on the torso, then paint out the pelvic region. At times you'll probably want to blur your mask as well; do this by pressing Ctrl (Windows) or Option (Mac) and clicking on the masked area.
 When you rotate the shoulders forward, you might get unwanted stretching in the upper arm. Here's where you can use the Move brush to bring the rest of the arm forward, smoothing the transition, then employ the Inflate brush to add back the volume lost during the smoothing.
 Now we'll give the model a little context by creating a base. Append a sphere and sculpt it to roughly match what's in the reference image. Make sure the feet are touching the base. Some useful brushes to quickly sculpt a base are Move, Dam_Standard, and TrimDynamic.
 Snap your camera to a front view and switch to Move mode. Drag your action line starting from the base straight down holding the Shift key. Click the first handle and, if needed, trim up the bottom of your base.
 Continue to refine and tweak your pose until you're satisfied. Feel free to add volume in the ribcage and pelvis—areas of the body where you want to exhibit the greatest concentration of body mass.
Homework:


Frank Frazetta
No comments:
Post a Comment